Setup a Tor Exit/Middle/Bridge relay
Tor is an anonymity tool used by those who want to stay private and uncensored when browsing the Internet, it’s working like a proxy but your traffic will be passing through multiple servers before reaching its final destination, the entire network is made of routers operated by volunteer so if you have the bandwidth and a spare server you could help make the Tor network more secure and faster.
Tor has 3 kinds of relays:
- Entry/Guard Relays - Entry points into the Tor network
- Middle Relays - Send traffic from an entry relay to an exit relay
- Exit Relays - Send the traffic out of the Tor network to the original destination on clearnet
When connected to a Tor network, your traffic will go like this if you accessing a website on a clearnet:
Your computer -> Entry Relays -> Middle Relay(s) -> Exit Relay -> Destination server
And like this if you’re accessing a .onion website:
Your computer -> Entry Relays -> Middle Relay(s) -> Destination server
Your traffic is fully encrypted while traveling through the Tor network, that means whoever operating the Entry and Middle relays can’t possibly know what kind of data you’re transmitting, the Entry Relay only know your IP address but don’t know what you’re sending through the Tor network, meanwhile the Exit Relay could only read your traffic (if it’s not end-to-end encrypted to Destination server like HTTPS) but it doesn’t know who has transmitted it.
If you accessing the .onion website, only your machine and the Destination server can read your traffic, it’s not needed to pass through the Exit Relay because the server of the .onion website is not located on regular internet. Because of this, no one knows where’s the exact location of a specific .onion server is at.
In this tutorial, I’ll show you how to set up all kind of Tor Relay node.
Requirement:
- Internet access
- Basic knowledge of Linux
Note:
Ask your ISP or your server hosting to see if they allow Tor Relay/Exit node first, most of ISP allow hosts Tor Relay on their network but not all allowing Tor Exit, because the Exit node will help Tor users access “real” internet that means they might get you into trouble if they’re doing anything illegal while connected to your Exit node.
Generally, it is safe to run a guard or middle relay on any VPS or shared server (such as DigitalOcean or EC2), since all the server operators will see is harmless encrypted traffic.
However, there are special responsibilities to consider when running an exit node. Since exit relays send traffic directly to the end destination, any illicit activity done through Tor appears to come from the exit relay. This leads to the rare possibility of raids, abuse notices, or more.
1. Install Tor
I’m using Debian 9, you could use the tor package from Debian default repo, however… but I want the latest one so I’ll proceed on adding repo from TorProject.
Always run apt update first to make sure you’ll install the latest packages.
root@tor-exit:~# apt update
Hit:1 http://security.debian.org stretch/updates InRelease
Ign:2 http://deb.debian.org/debian stretch InRelease
Hit:3 http://deb.debian.org/debian stretch-updates InRelease
Hit:4 http://deb.debian.org/debian stretch-backports InRelease
Hit:6 http://deb.debian.org/debian stretch Release
Reading package lists... Done
Building dependency tree
Reading state information... Done
All packages are up to date.
This will need to install apt-transport-https because TorProject’s repo using HTTPS instead of HTTP, this is not supported by default.
Reading package lists... Done
Building dependency tree
Reading state information... Done
The following NEW packages will be installed:
  apt-transport-https
0 upgraded, 1 newly installed, 0 to remove and 0 not upgraded.
Need to get 171 kB of archives.
After this operation, 243 kB of additional disk space will be used.
Get:1 http://deb.debian.org/debian stretch/main amd64 apt-transport-https amd64 1.4.8 [171 kB]
Fetched 171 kB in 0s (8,987 kB/s)
Selecting previously unselected package apt-transport-https.
(Reading database ... 30001 files and directories currently installed.)
Preparing to unpack .../apt-transport-https_1.4.8_amd64.deb ...
Unpacking apt-transport-https (1.4.8) ...
Setting up apt-transport-https (1.4.8) ...
You’ll need to import their PGP key, this will help APT know the package is downloaded from TorProject is legit and not altered/corrupted.
root@tor-exit:~# gpg --recv A3C4F0F979CAA22CDBA8F512EE8CBC9E886DDD89
gpg: directory '/root/.gnupg' created
gpg: keybox '/root/.gnupg/pubring.kbx' created
uid  deb.torproject.org archive signing key
sig!3        EE8CBC9E886DDD89 2012-08-29  [self-signature]
sig!3        EE8CBC9E886DDD89 2014-08-31  [self-signature]
sig!3        EE8CBC9E886DDD89 2009-09-04  [self-signature]
sig!3        EE8CBC9E886DDD89 2018-08-06  [self-signature]
sub  74A941BA219EC810
sig!         EE8CBC9E886DDD89 2012-08-29  [self-signature]
sig!         EE8CBC9E886DDD89 2014-08-31  [self-signature]
sig!         EE8CBC9E886DDD89 2009-09-04  [self-signature]
sig!         EE8CBC9E886DDD89 2018-08-06  [self-signature]
key EE8CBC9E886DDD89:
2 duplicate signatures removed
80 signatures not checked due to missing keys
gpg: /root/.gnupg/trustdb.gpg: trustdb created
gpg: key EE8CBC9E886DDD89: public key "deb.torproject.org archive signing key" imported
gpg: no ultimately trusted keys found
gpg: Total number processed: 1
gpg:               imported: 1

root@tor-exit:~# gpg --export A3C4F0F979CAA22CDBA8F512EE8CBC9E886DDD89 | apt-key add -
key EE8CBC9E886DDD89:
80 signatures not checked due to missing keys
OK
Now adding TorProject’s repo to apt sources.list.d directory
root@tor-exit:~# echo "deb https://deb.torproject.org/torproject.org stretch main" > /etc/apt/sources.list.d/tor.list
Now we re-run apt update again so apt will query available package from the updated sources.list
root@tor-exit:~# apt update
Hit:1 http://security.debian.org stretch/updates InRelease
Ign:2 http://deb.debian.org/debian stretch InRelease
Hit:3 http://deb.debian.org/debian stretch-updates InRelease
Hit:4 http://deb.debian.org/debian stretch-backports InRelease
Hit:5 http://ppa.launchpad.net/scaleway/stable/ubuntu bionic InRelease
Hit:6 http://deb.debian.org/debian stretch Release
Get:7 https://deb.torproject.org/torproject.org stretch InRelease [4,965 B]
Get:9 https://deb.torproject.org/torproject.org stretch/main amd64 Packages [3,465 B]
Fetched 8,430 B in 1s (7,620 B/s)
Reading package lists... Done
Building dependency tree
Reading state information... Done
All packages are up to date.
Install Tor and TorProject’s keyring
root@tor-exit:~# apt install tor deb.torproject.org-keyring
Reading package lists... Done
Building dependency tree
Reading state information... Done
The following additional packages will be installed:
  libzstd1 tor-geoipdb torsocks
Suggested packages:
  mixmaster torbrowser-launcher tor-arm apparmor-utils obfs4proxy
The following NEW packages will be installed:
  libzstd1 tor tor-geoipdb torsocks deb.torproject.org-keyring
0 upgraded, 4 newly installed, 0 to remove and 0 not upgraded.
Need to get 3,282 kB of archives.
After this operation, 12.9 MB of additional disk space will be used.
Do you want to continue? [Y/n] y
Get:1 http://deb.debian.org/debian stretch/main amd64 libzstd1 amd64 1.1.2-1 [193 kB]
Get:2 http://deb.debian.org/debian stretch/main amd64 torsocks amd64 2.2.0-1+deb9u1 [72.7 kB]
Get:3 https://deb.torproject.org/torproject.org stretch/main amd64 tor amd64 0.3.4.9-1~d90.stretch+1 [1,718 kB]
Get:4 https://deb.torproject.org/torproject.org stretch/main amd64 tor-geoipdb all 0.3.4.9-1~d90.stretch+1 [1,289 kB]
Get:1 https://deb.torproject.org/torproject.org stretch/main amd64 deb.torproject.org-keyring all 2018.08.06 [4,922 B]
Fetched 3,273 kB in 0s (6,112 kB/s)
Selecting previously unselected package libzstd1.
(Reading database ... 30007 files and directories currently installed.)
Preparing to unpack .../libzstd1_1.1.2-1_amd64.deb ...
Unpacking libzstd1 (1.1.2-1) ...
Selecting previously unselected package tor.
Preparing to unpack .../tor_0.3.4.9-1~d90.stretch+1_amd64.deb ...
Unpacking tor (0.3.4.9-1~d90.stretch+1) ...
Selecting previously unselected package torsocks.
Preparing to unpack .../torsocks_2.2.0-1+deb9u1_amd64.deb ...
Unpacking torsocks (2.2.0-1+deb9u1) ...
Selecting previously unselected package tor-geoipdb.
Preparing to unpack .../tor-geoipdb_0.3.4.9-1~d90.stretch+1_all.deb ...
Unpacking tor-geoipdb (0.3.4.9-1~d90.stretch+1) ...
Selecting previously unselected package deb.torproject.org-keyring.
Preparing to unpack .../deb.torproject.org-keyring_2018.08.06_all.deb ...
Unpacking deb.torproject.org-keyring (2018.08.06) ...
Setting up libzstd1 (1.1.2-1) ...
Processing triggers for libc-bin (2.24-11+deb9u3) ...
Processing triggers for systemd (232-25+deb9u6) ...
Processing triggers for man-db (2.7.6.1-2) ...
Setting up deb.torproject.org-keyring (2018.08.06) ...
Setting up torsocks (2.2.0-1+deb9u1) ...
Setting up tor (0.3.4.9-1~d90.stretch+1) ...
Something or somebody made /var/lib/tor disappear.
Creating one for you again.
Something or somebody made /var/log/tor disappear.
Creating one for you again.
Created symlink /etc/systemd/system/multi-user.target.wants/tor.service → /lib/systemd/system/tor.service.
Setting up tor-geoipdb (0.3.4.9-1~d90.stretch+1) ...
Processing triggers for systemd (232-25+deb9u6) ...
2. Prepare Tor config
You’ve just installed Tor successfully (hopefully), now you must tell it what you’re going to do with it
If you have an IPv6 and want your Tor Relay to listening on IPv6 and are able to access IPv6,
check Step 2.1 (optional)
If you want to set up a Tor Bridge, get the config from Step 2.2
If you want to set up a Tor Relay, get the config from Step 2.3
If you want to set up a Tor Exit, get the config from Step 2.4
and then continue on Step 3
2.1. Getting your IPv6 address
By default Tor does not listen on IPv6 and will not automatically detect your IPv6 interface, you’ll need to get your current IPv6 and enable Tor to use it.
You could get your current IPv6 address by:
root@tor-exit:~# ip a
1: lo: <LOOPBACK,UP,LOWER_UP> mtu 65536 qdisc noqueue state UNKNOWN group default qlen 1
    link/loopback 00:00:00:00:00:00 brd 00:00:00:00:00:00
    inet 127.0.0.1/8 scope host lo
       valid_lft forever preferred_lft forever
    inet6 ::1/128 scope host
       valid_lft forever preferred_lft forever
2: ens2: <BROADCAST,MULTICAST,UP,LOWER_UP> mtu 1500 qdisc pfifo_fast state UP group default qlen 1000
    link/ether de:1a:24:26:50:04 brd ff:ff:ff:ff:ff:ff
    inet 10.16.41.7/31 brd 10.16.41.7 scope global ens2
       valid_lft forever preferred_lft forever
    inet6 2001:bc8:4400:2c00::5:c07/127 scope global
       valid_lft forever preferred_lft forever
    inet6 fe80::dc1a:24ff:fe26:5004/64 scope link
       valid_lft forever preferred_lft forever
Look for the line that said inet6 and global, in this case, my IPv6 is 2001:bc8:4400:2c00::5:c07, write it
down because you’ll need it later.
2.2. Tor Bridge config
ORPort auto
ORPort [INSERT_IPV6_ADDRESS]:auto
SocksPort 0
BridgeRelay 1
Log notice file /var/log/tor/notices.log
DirPort 9030
ExitPolicy reject6 *:*, reject *:*
If you’re behind a NAT firewall, you could change the port number auto and 9030 to suits your needs.
DirPort doesn’t need to listen on IPv6, it will return an error if you try to do that.
If you don’t have an IPv6, remove the second “ORPort” and the “, reject6 :”
Skip to Step 3 from now
2.3. Tor Relay config
SocksPort 0
RunAsDaemon 1
ORPort 9001
ORPort [INSERT_IPV6_ADDRESS]:9001
Nickname YourAwesomeRelayName123
ContactInfo YOUR_EMAIL_HERE [AT] DOMAIN [DOT] EXT
Log notice file /var/log/tor/notices.log
DirPort 9030
ExitPolicy  reject *:*, reject6 *:*
You should change the Nickname and ContactInfo as you’d like.
Nickname only allow 1 to 19 characters, only letters, and numbers, no spaces or other special characters.
ContactInfo here you should put your email with slightly obfuscated so scrapper will not add your email to their
spam list, this emails will be used to contact you and will be published on Tor Atlas.
If you’re behind a NAT firewall, you could change the port number 9001 and 9030 to suits your needs.
DirPort doesn’t need to listen on IPv6, it will return an error if you try to do that.
If you don’t have an IPv6, remove the second “ORPort” and the “, reject6 :”
Skip to Step 3 from now
2.4. Tor Exit config
SocksPort 0
RunAsDaemon 1
ORPort 9001
ORPort [INSERT_IPV6_ADDRESS]:9001
Nickname YourAwesomeRelayName123
ContactInfo YOUR_EMAIL_HERE [AT] DOMAIN [DOT] EXT
DirPort 80
DirPortFrontPage /etc/tor/tor-exit-notice.html
ExitPolicy accept *:*, accept6 *:*
IPv6Exit 1
ExitRelay 1
You should change the Nickname and ContactInfo as you’d like.
Nickname only allow 1 to 19 characters, only letters, and numbers, no spaces or other special characters.
ContactInfo here you should put your email with slightly obfuscated so scrapper will not add your email to their
spam list, this emails will be used to contact you and will be published on Tor Atlas.
If you’re behind a NAT firewall, you could change the port number 9001 and 80 to suits your needs.
DirPort doesn’t need to listen on IPv6, it will return an error if you try to do that.
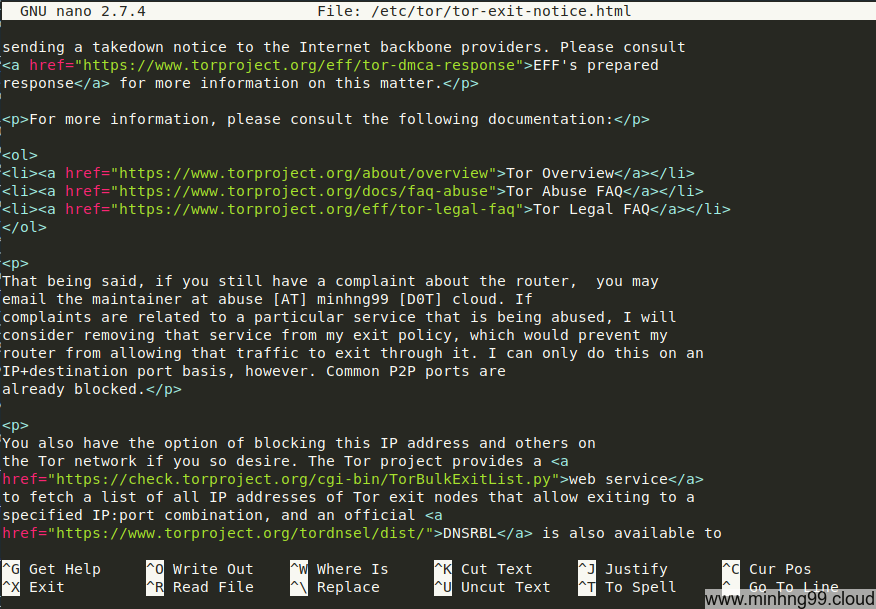
With Exit Relay, you also can put a little HTML page in the path of DirPortFrontPage so whenever someone visited your
Exit Relay’s IPv4 Address they will be greeted with your HTML message, the common Tor Exit FrontPage HTML is HERE.
If you don’t have an IPv6, remove the second “ORPort” and the “, accept6 :
Continue to Step 3
3. Write config file and enable Tor
Now you’ve got your config file content, put it into /etc/tor/torrc, you could even delete the default file if you want,
the configs in step 2. are already enough to get Tor run.

I also have added my FrontPage based on the one from TorProject’s, notice that in the FrontPage has some FIXME value that you’re supposed to change them.
Save it all and now we’re going to get it up and running.
Enable the Tor service startup with (skip this step if you don’t want Tor to run on startup)
root@tor-exit:~# systemctl enable tor
Synchronizing state of tor.service with SysV service script with /lib/systemd/systemd-sysv-install.
Executing: /lib/systemd/systemd-sysv-install enable tor
And start Tor service
root@tor-exit:~# systemctl start tor
Tor should be running now, check to see if the service still running with
root@tor-exit:~# systemctl status tor
● tor.service - Anonymizing overlay network for TCP (multi-instance-master)
   Loaded: loaded (/lib/systemd/system/tor.service; enabled; vendor preset: enabled)
   Active: active (exited) since Sun 2018-12-02 08:36:59 UTC; 11min ago
  Process: 1810 ExecStart=/bin/true (code=exited, status=0/SUCCESS)
 Main PID: 1810 (code=exited, status=0/SUCCESS)
    Tasks: 0 (limit: 4915)
   CGroup: /system.slice/tor.service

Dec 02 08:36:59 tor-exit.minhng99.cloud systemd[1]: Starting Anonymizing overlay network for TCP (multi-instance-master)...
Dec 02 08:36:59 tor-exit.minhng99.cloud systemd[1]: Started Anonymizing overlay network for TCP (multi-instance-master).
If you see it’s active that means there’s no error and it’s running in the background.
Make sure you’ve forwarded port to your Tor relay properly, it won’t work without port forwarding.
After around 12 hours, you could go to Tor Relay Search, type in your relay’s Nickname
and see how it’s doing, it should look something like this:
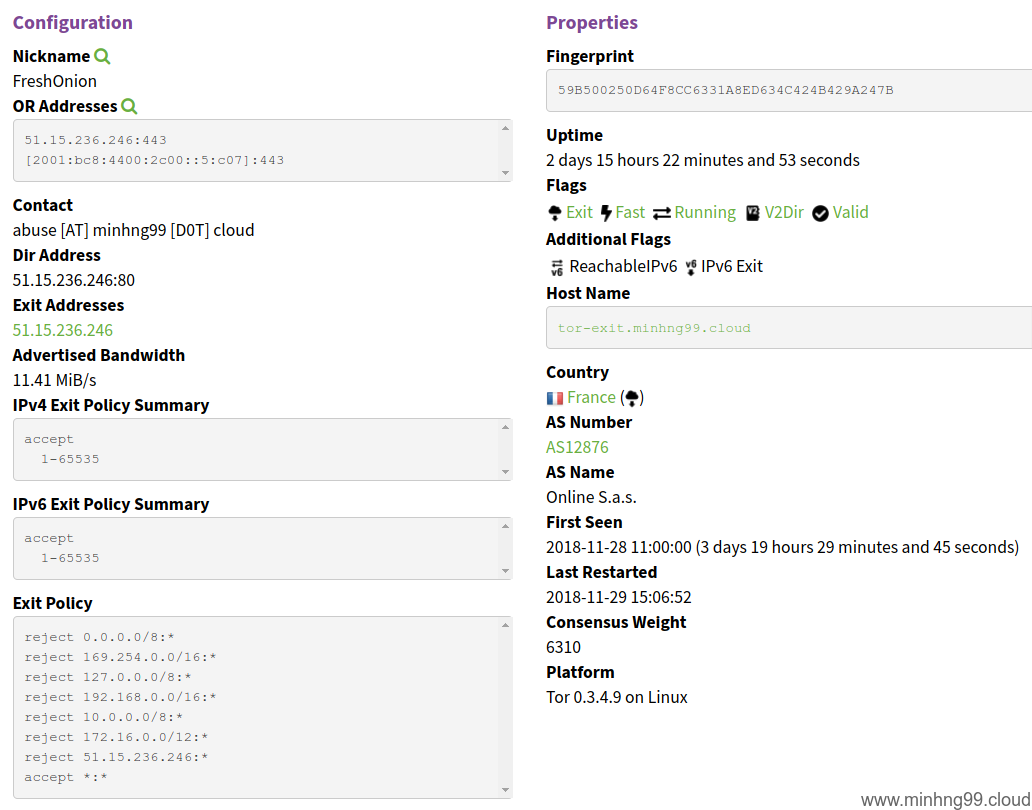
Your Tor relay will not be doing much work until 2 weeks later so just be patient.
Resources:
How Tor works Tor config generator TorProject’s Debian/Ubuntu instruction